Sunday, January 13, 2013

Heatless curls

I love curling my hair but I feel so guilty when I use a lot of heat on it. Even if I use a heat protector I still feel like I'm slowly killing my hair strand by strand. This guilt does not always stop me from grabbing my curling iron, though, because I do often. I have long hair and I'm lazy, these two things combined mean that I often sleep late (the snooze button and I are well acquainted) and don't have time in the morning to curl my hair. To save myself time, I will use Conair Spiral Rollers. These things are great! I picked them up at Walgreens a long time ago for around twelve dollars, I got the package that contains both blue and pink rods, the pink are a bit wider and the blue a bit more narrow. I use both sizes in my hair when I do this, I don't see much of a difference in curl size. This is best done at night as it takes hours for my hair to set into a curl. I like to shower at night, let my hair air dry 100% because my hair is thick and if I did this wet, or even damp, my hair would not be dry the next morning. After my hair is dry I like to put mousse or some other type of curling product in it for two reasons. Firstly, I have naturally straight and hard to curl hair and product helps my curls last longer. Secondly, it helps to create more defined and less frizzy looking curls.
 
I bought this Not Your Mother's Kinky Moves Curl Defining Hair Cream recently and I really like it thus far. It was somewhere in the range of 6-7 dollars and I had to buy it because of the smell. I think it smells so good. Before I bought this, though, I was using Suave Professionals Captivating Curls Whipped Cream Mousse. The Suave also smells nice and has a really creamy and not so airy mousse texture so I feel like it can hold my thick hair better.
 
 
After I apply a curl boosting product I section my hair into two halves just above my ears and clip up the top section. I work from the bottom section first. I like to split that bottom section into two and bring it each section to the front of my shoulders. So now half of my first section is on my right shoulder and the other half is on my left. I split up my rollers and start rolling. There are two ways that I know of to roll with these but I only use this technique I'm going to demonstrate because it gives really nice spiral Taylor Swift inspired curls.
 
I grab about a one to one and half inch section of hair starting from the back. I like to do about 4 rollers on each side of my head.
 

I hold the roller behind the section of hair so that when I start wrapping I am wrapping away from my face, it's just my personal preference.
 
 
Then I use my free hand to wrap the whole section of hair down around the roller starting at the root and ending at the tip. I don't like to start rolling RIGHT at my root, though, I leave about an inch or so of hair unrolled. 
 Then, I just bend each end over to secure my hair, I know it seems like it won't stay but it really does.
 
I continue this process alternating pink and blue rollers (but I don't think it really matters) so that I have 8 rollers in my bottom section. Then I let down my top section of hair and begin in the back of my head grabbing sections. I don't really go in any particular pattern on my top section because I think it looks nice and natural when these curls aren't too structured. Sometimes I will clip my bangs back into a poof or I'll just leave them out of the rollers all together. I have rolled my bangs but the come out very curly because my bangs are quite short, they start at about my cheekbone and curl up to my eyebrow when I roll them. This set comes with 16 rollers which I find to be plenty.

These are foam so they are not very uncomfortable to sleep on and sometimes I cover my head with a scarf to sleep in them, but not all the time. In the morning before I put on my make up I unroll all of the roller and let the spirals fall a little bit because they tend to be EXTREMELY curly when I first take them out. After I put on my make up I like to just finger comb through the curls a bit to loosen them up and separate them. I also rub a little bit of serum or of the Kinky Moves between my hands and run it over my hair. Within the first hour or so of the day the curls fall nicely leaving these spiral waves:


I really love these rollers, they are a great way to get heatless curls that mimic the look you get from a curling wand. It saves me time in the morning and saves my hair from scorching heat.

From Day to Night

Let's just be honest here, some mornings we are too lazy to put on a full face of make up. Well, that tends to be most mornings for me personally. However, there are days where I like to be lazy in the morning and not put on much make up for work or running errands, but I know that I have plans later in the night where I'm going to want to look a little more made up. For those days I turn to my go-to night time smokey eye. This is what I will do if I need a quick make up look for night. I generally do a variation of this look (using the same techniques but different colors) whenever I wear a smokey eye for any occasion.

If I'm being lazy or am very pressed for time in the morning, this is what I'll do, a little foundation, concealer, and mascara:
 
 
Here are two palettes that I like to use on a daily basis whether it be for a smokey eye or any other look:
 
Below is the E.L.F. Little Black Beauty Book. I believe it was $5.00 and it has a good range of shadow shades all in one place. Some of the shades are better quality than others (some are chalky and some have chunky glitter specks) but for five bucks that is to be expected and over all it is a decent and versatile palette.

Below is my favorite nude palette that I used in my everyday face post (which you can find here) and it is the NYX Butt Naked Eyes palette.
To begin, I will choose an all over lid shade, I typically stick with something shimmery and neutral for this. Here is an example of a shade I usually choose from the E.L.F. palette:
And here is one that I would choose from the NYX palette. This is the one I chose to use today.
I put this all over the lid from lash to crease with a flat shader brush:
And then I bring the same shade under the lower lash line with a small angled brush:
 
Next I will choose a matte brown shade to define my crease and blend out the lid shade. I like to use E.L.F.'s Deluxe Crease Brush for this:

 Next I take any dark shade, here I chose this dark chocolate-y brown, on a pencil brush for my outer "V" area.
Here is where your particular eye shape comes in to play. The size of your lid and the shape of your eye will dictate where you place this shadow. I like a more cat eye look with a darker outer half of the eye so I start in the outer 1/3 of the crease and bring it over to the top of the lash line. (This creates the side ways "V")

I tend to keep dragging my brush further and further up past the crease making a half moon shape above the crease:
I usually add a good amount of darker shadow but you can definitely go for a softer look by using a lighter shade or just a lighter hand.
When I've made a shape that I am happy with I like to drag the same color with the same pencil brush to the outer half of the lower lash line so it connects with the outer "V."
 
To blend out the dark outer V into the very light lid color I will choose a mid-toned shade to place right in the middle of the lid.
I use a flat shader brush to pat the color on the very center of the lid and then flip the brush to the clean side and wiggle it back and forth a little to bring the dark and light shades together:
Below the dark outer V shade looks harsh against the rest of the shadows:
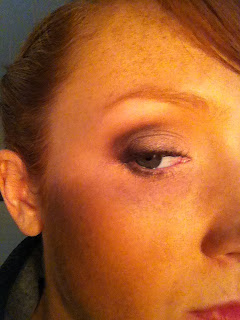
I use a clean crease brush to just blend out the color and make it look a little softer:
Last for the shadow shades, a highlight shade. I like to use the matte white on a smokey eye right on the brow bone and on the inner corner of the eye:


I am a cat eye and a liquid liner addict. My favorite liquid liner of all time is the L'Oreal Lineur Intense Felt Tip Liquid Eyeliner. I have used and liked other liquid liners but this one is my holy grail, if they ever discontinue it I don't know what I'll do. The felt tip is easy to work with and you can create a really thin line as well as a really thick line with it. 


I first line the upper lash line right to the end of the eye starting out thinner at the inner corner and gradually getting thicker toward the outer corner.
If you don't like liquid liner or a cat eye you can use whatever type of liner you're comfortable with, even a dark black shadow on an angled brush will work.
To make my wing I like to follow the natural line of the lower lash line and make a line as far as I feel fit. Some days I like a long and dramatic wing and others I go for a shorter more subtle wing.
Once I have that line down I just start from the top of the wing and draw back down to the line I already made at the lash line. This leaves me with a little triangle to fill in:

 
Here is the finished wing, it's easier than it looks and just takes a little practice. Resting your elbow on the table helps to steady your hand. 


Next I add another coat of mascara, there's no such thing for me as too much mascara when you have a smokey eye going on, your lashes can get lost agaisnt all of those dark shadows.
I also like to line my water line with a black pencil to add a little more drama and definition to my eye.
 
And here is the finished look, it took me about 6 minutes to do one eye so it probably takes between 10 and 15 minutes to do both. If I have extra time I will throw on some false lashes, but I didn't for this tutorial.


 Here is are both eyes, one ready for a night out and the other for a day at the office:


And finally, here I am with BOTH of my eyes done: